We had our first open house this past Sunday and it went really well. I was honestly thinking the worst--that no one would show up. I'm glad I was wrong!
We had 3 groups of people come. An older woman came and took a walk through about 30 minutes into the open house. A guy came in to look for him, his wife, and their little boy who was sleeping in the car. He liked what he saw and asked alot of questions about the association and the taxes. The final group that came consisted of two sisters that wanted to get a place together. Right off the bat try loved our place. It makes you feel good when strangers react that way :) They said that they really liked everything about it but the second bedroom was small. There's nothing we can do about the size of the rooms, unfortunately. Maybe the girls will reconsider and change their mind...a girl can dream, right?!
We advertised on owners.com and craigslist but no one from there came through. They were all drivebys without a realtor at the moment. We're considering having another open house this weekend, but I think we'll take turns being here.
We're off to a good start!
Showing posts with label Remodeling. Show all posts
Showing posts with label Remodeling. Show all posts
Tuesday, February 23, 2010

Sunday, February 21, 2010
First Open House
Today is our first open house. It's only been 15 minutes and I'm already worried that no one will come. We lucked out because there's another open house around the corner. Hopefully this will bring a few more people this way.
The house looks absolutely immaculate and smells like fresh baked chocolate chip cookies. Even if one person comes, I think it will make it worthwhile.
Wish us luck!
The house looks absolutely immaculate and smells like fresh baked chocolate chip cookies. Even if one person comes, I think it will make it worthwhile.
Wish us luck!
Friday, February 19, 2010
How we spent our Valentine's Day
Mr. B and I never really made a big deal about Valentine's Day. We usually get each other cards and either head out to dinner (early) or cook up something at home.
I have to say that this V-day was completely different than any one before it. First of all, Mr. B gave me my present 2 days early. He got me a new iPod nano :) He said that he would have gotten it for me even if it wasn't Valentine's day because I've been complaining so much about my old (so old it won't hold a charge) one.
The day of V-day began by ripping out the kitchen faucet and a quick run to Lowes' for some new faucet lines. That 'quick' trip to Lowes turned into looking for some laminate tiles for the laundry room to cover up the gross, original flooring. I do have pictures of both projects, but right now I'm blogging from my couch on my iPhone and I'm way too comfortable ( and lazy) that I'll have to upload them later. The faucet project was pretty fast (30 more minutes),but the 'oh babe, don't worry it'll be easy and quick' floor install took over 3 hours. Oops!!
Once I get into a project I don't like to stop. Pretty sure I get that from my dad. He is a habitual project starter, but once he starts he hates to stop. His hands could be falling off and you'd have to beg and propsition him from here to Monday to get him to consider a break. As a result, Mr. B had to bribe me with pizza to tear me away from tiling.
I'm so happy that we had such a productive day. It might not have been romantic, but I'm glad we could spend it together!
I hope everyone else had a great V-day! Pictures coming soon.
- Mrs. B
Wednesday, January 27, 2010
Staging
I just wrote up an entire post on staging our house and I deleted it by accident. Doh! That's what I get for typing it up on my iPhone at work.
We are in the process of staging our house so we can put it up for sale. Mr.B and I have been in quite a few open houses over the past year and, needless to say, not many people take the advice the plaster all over HGTV. Staging sells houses! The buyer wants to be able to picture themself in your place; they don't want to see all your junk and wonder if they can fit all of their stuff in there.
This is why Mr.B and I are beginning the process of clearing out everything that is not absolutely necessary. Like those plates from college we haven't used in 3 years, or that electric knife that's still in the box from my bridal shower or my stack of year books. Going through all of our stuff has made me wonder why we even still have all of these things I we don't need them. I love getting rid of clutter--it's cathartic for me. I'm beginning to wonder if I've just been holding on to stuff just to be able to throw it away later, but I know it's really because I've been waiting for us to get a house. I'd see some fabric and say," that would be great for curtains in a kitchen" even though there are no windows in our kitchen now. Or I'd make a great find at Marshalls and snatch it up for 'later'.
This weekend should be filled with more exploration into every nook and cranny in our place, which I'm thoroughly looking forward to. I'm hoping to find some long lost something that I can use to help decorate and make our place look so absolutely fabulous that the first person in the door will NEED to have our place whatever the cost (a girl can dream, right?)
I hope to post some pictures sometime this weekend. Maybe some before and afters or maybe just some befores...depends on how sucked in I get to cleaning :)
-Mrs. B
Monday, October 12, 2009
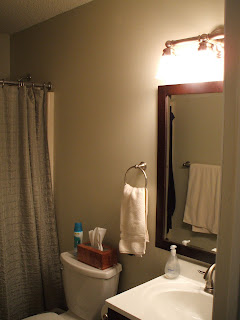
Found the Bathroom Before Pics!
I turned on my super slow old computer and dug through hundreds of pictures (which is one reason why it could be so slow). I really don't know what the previous owners were thinking when they painted (almost) the entire bathroom blood red. The flash actually makes it look alot lighter than it was.


 Why would you not paint the last wall? Strange.


 Why would you not paint the last wall? Strange.
Sunday, August 9, 2009
Remodeling Updates
Friday I decided to paint the kitchen with a free pint of paint i got from Glidden when they were having their promotion. I painted a 2x2 patch in the kitchen and really had doubts, but Mr. B said that it would look good. I proceeded to paint for the next 3 hours, moving the fridge, stove and climbing all over the countertops to pain above the cabinets.
After I finished I got this sinking feeling in my stomach once I looked at the final product. HIDEOUS! Absolutely dreadful. I should have known that it would turn out the same as what the previous owners painted the living room.
I thought, well maybe it's because I'm not used to it and I need to let it grow on me. 2 hours later I was convinced I would hate it forever and that Mr. B would hate it too. He got back from class and the first thing he asks me is if I like it...bad sign. This means that he hates it but is feeling me out to see if I like it.
We both start laughing because it's so hideous and we know that we could never like it. Plan B--I pick out a color that goes with the rest of the decor in the dining room and living room. The next day I woke up bright and early, went to Home Depot with my color and found a great new invention--pint-sized paint cans that have primer mixed in. YES!!! This is exactly what I need, being that it's a super small space with hideous electric yellow paint wall to wall.


I ride home from Home Depot joyfully with my new paint color, paint a little patch against the yellow and declare war against the evil paint. I spent another 3+ hours yesterday annihilating the yellow and replacing it with a peaceful green. It's close to my bathroom color, but a little darker with some brown hints to match with the living room and dining room neutrals.
I absolutely love it and I wish this would have been the first color I picked. We are not yellow people. Oh well, you live and you learn. I'll post pictures of the better color soon.
A little tip to future painters: If you paint a patch of color and don't love it, please don't paint the whole room! Go with your gut. If you hate it, you hate it; just get a different color.
Saturday, August 1, 2009
Supplies
Yesterday I ran errands all morning to get ready to fix the trim, put a new door handle on and paint the kitchen and doors. The only thing I got accomplished was the trim, but it's a huge improvement :)
Tuesday, July 28, 2009
Some Before Pics--Living Room/Dining Room
Since I've already posted the after pictures from our renovation projects, I thought I'd post some of the befores. Honestly, it doesn't even look like the same house!
Here's a picture of the front door and part of the dining room. Notice the lovely bamboo placemats they used to separate the dining room and living room paint color. It looked so stupid. Also notice the shelves that are directly above the couch (i.e. head trauma in waiting) and a shelf so low that you can't walk behind the couch to get to the closet. Oh, and the nekkid woman painting on the top shelf. Don't even get me started on the canary yellow paint.


The nasty yellow wall--what were they thinking??

Why put a couch in front of a huge bay window like that??

Hmm...let's just stop at the entry wall and not paint the rest of the room. That won't look stupid.
Next up, the bathroom of death.
Monday, March 23, 2009
How to replace a cracked tile
The cracked tile we were replacing was underneath our toilet, so we decided we would buy a new toilet and then replace the tile. The first thing you want to do, it take everything you can out of the bathroom. To remove the tile, you will need:


Once you get a few pieces up, you can use the multi-tool or the screw driver to work under the loose pieces. Keep hammering until the entire tile is in pieces or pretty loose. Use the multi-tool to get up the remaining chunks of tile.

At this point, you're going to use the multi-tool to get the mortar off of the cement board or cement. Make sure if you have cement board that you're not scraping off the mesh. You can use the flat head screw driver and a hammer to chip any remaining grout off of the surrounding tiles. You should also make sure that all of the screws are set into the cement board. Some of ours were sticking up, which may have been the initial cause of the tile crack. We brought the screws up and then redrilled them to make sure they were sunken into the board. Sweep and vacuum up all of the dirt and debris. Now you're ready for the new tile.

To set the new tile you will need:
Next, we applied the mortar to the area. We used a remixed mortar and I find it easiest to apply first with a Spackle spatula and then use the trowel to put the tracks into the mortar. Apply mortar to the back of the tile to get better adhesion. Place the tile in the space and slide it back and forth to allow the mortar to grip the tile. Use level to make sure the tile is even and adjust as necessary. If the tile is not installed level, it may crack again.
Once the tile is leveled, put spacers in and clean up all of the mortar on the tile and in the grout lines. A small flat head screwdriver is useful for getting in between the tiles. Let the mortar dry 24 hours before you grout.

We used a premixed sanded grout that is stain-resistant. Since it was a small area, I packed it directly into the grout lines with the spackle spatula and then smoothed with a wet tile sponge. (For a larger area, you would use a Float to apply and remove excess grout.) Make sure you get as much of the grout up as you can, because once it dries, it's hard to get up. Let the grout dry for 24 hours and after that, it's safe to walk on.

Happy remodeling!
- Safety glasses--very important!!
- Work gloves
- An old towel--one you don't mind throwing away
- A hammer
- A grout digger--looks like a screwdriver with a triangular head
- A flat head screwdriver
- A multi-tool--looks like a spatula with all kinds of groves on the sides


Once you get a few pieces up, you can use the multi-tool or the screw driver to work under the loose pieces. Keep hammering until the entire tile is in pieces or pretty loose. Use the multi-tool to get up the remaining chunks of tile.

At this point, you're going to use the multi-tool to get the mortar off of the cement board or cement. Make sure if you have cement board that you're not scraping off the mesh. You can use the flat head screw driver and a hammer to chip any remaining grout off of the surrounding tiles. You should also make sure that all of the screws are set into the cement board. Some of ours were sticking up, which may have been the initial cause of the tile crack. We brought the screws up and then redrilled them to make sure they were sunken into the board. Sweep and vacuum up all of the dirt and debris. Now you're ready for the new tile.

To set the new tile you will need:
- Mortar
- Grout
- Trowel
- Spackle spatula
- Bucket with warm water
- Sponge
- Float
- Wet saw
- Tile trimmer
- Level
- Spacers
Next, we applied the mortar to the area. We used a remixed mortar and I find it easiest to apply first with a Spackle spatula and then use the trowel to put the tracks into the mortar. Apply mortar to the back of the tile to get better adhesion. Place the tile in the space and slide it back and forth to allow the mortar to grip the tile. Use level to make sure the tile is even and adjust as necessary. If the tile is not installed level, it may crack again.
Once the tile is leveled, put spacers in and clean up all of the mortar on the tile and in the grout lines. A small flat head screwdriver is useful for getting in between the tiles. Let the mortar dry 24 hours before you grout.

We used a premixed sanded grout that is stain-resistant. Since it was a small area, I packed it directly into the grout lines with the spackle spatula and then smoothed with a wet tile sponge. (For a larger area, you would use a Float to apply and remove excess grout.) Make sure you get as much of the grout up as you can, because once it dries, it's hard to get up. Let the grout dry for 24 hours and after that, it's safe to walk on.

Happy remodeling!
Tuesday, December 30, 2008
Home Updates
I had the week off from work, so I figured I'd get some things done around the house. Yesterday I finished the floor trim, which took all day! I also fixed up the trim in the bathroom. Today I put some hardware on the cabinets and spray painted the hinges to match. I still have to put some handles on the drawers. Next on the list is painting the kitchen, putting some finishing touches on the bathroom remodel, and painting the doors.


Wednesday, October 15, 2008
Remodel Pics
Pictures as promised! We still have to do some minor work with the trim, but it's 95% done :)
Before:


After:


Here are some during pics. I had a little casualty involving a sharp metal object.


 Those were real tears. If only you could hear the cursing.
Before:


After:


Here are some during pics. I had a little casualty involving a sharp metal object.


 Those were real tears. If only you could hear the cursing.
Monday, September 22, 2008
Remodeling
Mr. B and I pretty much just hung around all weekend. Friday night we decided to go over to the driving rang and hit a few balls. I had no clue what I was doing, but about 20 balls into my bucket I was actually able to hit the ball and get some distance--I was pretty proud of myself.
Afterward we picked up two movies at Blockbuster, The Cube and The Bank Job. I've seen Cube before and thought it was alright. It's a pretty messed up movie overall. The Bank Job was really really good! I love me some Jason Statham!!
Saturday we went and looked at some granite for the kitchen. We picked out a lighter color with darker streaks of color in it. It's fairly cheap too and they're coming out for an estimate on Thursday. Mr. B and I pretty much decided that we're going to wait a little bit to do the countertops though. We'd like to get the other bathroom done first. Yesterday we ended up buying a fridge at Lowes and then heading over to Home Depot to buy a vanity, tile, and a faucet. Next weekend we're going to pick out the paint color and get a mirror and light fixture. In two weeks we asked my dad to come over and help us install the tile. I'll make sure to post some before and after pictures on here.
We're so excited for a fridge that actually works and doesn't suck up electricity like crazy! Our fridge now has been leaking water out of the drip thingy underneath the freezer and generally not working well. It's so annoying! I feel like things go bad so fast. We're coming in about $300 under our budget for a fridge and $1100 under budget for our windows. We'll use part of that $1100 for the guest, Mr. B's, bathroom. We picked a pretty cheap ceramic tile, but I think it will look much nicer than the ugly, stained linoleum tile that's down now.
I'm so excited to do some renovations!
Subscribe to:
Posts (Atom)